Hunted by Light : Open-world Cave level

Project info
Project description
Cave level set in a fantasy and open-world game. The player has to explore a cave upon witnessing what can happen to people who approach it. Always aiming to create memorable experiences for players, the player needs to be careful and aware of the surroundings while navigating through a tense and threatening atmosphere with light being a guide and... a problem at the same time.
Details
- Personal project
- Unreal Engine 5
- Action RPG
- 3rd person
- Semi-linear
Level Design Workflow - Layout overview (Molecular Diagram)

Level Design Workflow - 2D Map (Top-down)

In order to boost the sense of exploration and traversal, the entire level is splitted into three different heights as stated in the image:
- Ground level: The initial exterior part and the cave's main rooms
- Upper level: Formed by the two infiltration rooms next to the main entrance
- Lower level: Formed by the rooms past the Altar and one of the side rooms
The rooms located in the Upper level offer the players a way of infiltrating the cave from above, giving them a vantage point when reaching the Initial Room inside the cave. At the same time, they teach the player the climbing mechanic that they will be using later on.
The rooms forming the Lower level add some more depth into the cave by being in a lower height compared to the previous chambers. With this the players' sensation of getting deeper into the level and closer to the monsters' territory increases, highlighted by the fact that the first room they encounter when accessing the lower level past the Altar Room seems to be some sort of monster lair.
The elements that form the entire cave level apart from enemies are the following:
- Narrative: The players can find a Journal entry at the start of the level that will give them more information about what happened. After defeating the boss, they will encounter the second narrative element. The main idea is to give little to no narrative guidance, so the players need to understand the situation and learn what can help them explore and what not as they play the level.
- Altar mechanisms: Special mechanisms the players need to find around the cave in order to be able to interact with the Altar and progress further. Their obtention will be linked to either defeating enemies or solving puzzles.
- Loot/Items: Most of the items will be loot the players can find and obtain, but there will be 1 or 2 that will have an impact on the exploration and navigation, therefore the players have to find those. In order to avoid player frustration and affect their experience negatively , those special items will be slightly highlighted.
Level Design Workflow - Beats & Pacing

Click the image for full-screen
After the creation of the Level Flow Diagram and 2D map, in this section I present the Level's Beat Chart. This chart, in combination with the previous two, lets me add an extra layer of information to the overall layout and design in terms of checking how the pacing and level feels. With this done, in the next section I will be presenting the Intensity Chart.
In order to further explain the Beat Chart, and given that a beat can be seen as a small self-contained chunk of a level and that several of them for a level, I have splitted the 2D map into pieces, each of them associated with one or more beats that are directly connected.
For each piece, I comment some of the design decisions made to ensure proper gameplay, pacing and how they can affect the player experience.
Beats Breakdown - Click to show
Beats Breakdown - Click to show
This is the initial area of the level, one that offers the players a moment to get acquainted with the surroundings and some of the basic controls before progressing to the next spot. As the players walk forwards, they can see a hanging bridge which seems to be the only way to progress.
To guide the players easily, some vegetation and rocks are scattered around the plateau to form some sort of natural path that connects them with the bridge. The hanging bridge clearly tells the player to progress forwards through it.
Upon crossing the hanging bridge, the players reach a bigger plateau and are met with a short cutscene displaying some sort of beast roaming around a concrete spot. This encounter is meant to serve three specific purposes:
- Alert players from potential dangers they might find when exploring further without combat yet
- Presenting an initial piece of lore that begins to explain what happened
- Presenting a new movement type (crouching) to the players
The players have to approach the beast without being noticed by crouching in order to investigate more. After a few seconds, the unknown beast runs away and enters what seems to be a cave through an elevated gap, letting the players investigate the plateau closer.
When investigating the area in more detail the players find a corpse and what seems to be a journal. The journal gives some initial information to the players, making them realize a cave is sitting in front of their eyes. With the main entrance blocked by debris, the players need to find a way in if they wish to explore further.
After investigating the corpse and journal, the players can roam around the plateau freely if they wish while finding a way to infiltrate the cave as the main entrance is blocked. If they paid attention to when the beast disappeared, they should have discovered the location of the potential secondary entrance. When approaching the spot from below, the game presents the players a new mechanic (mantling) they can use on some “natural ledges” . This alternative entrance is lower than the one the beast used.
By following the trail formed by the ledges, the players end up reaching the first room within the cave. Upon closer inspection, the player can see some blood drops and scratching marks as they progress, highlighting the sense of danger as they explore. This room is mostly dark, with just a hint of light coming from the outside through the gap they used to enter.
Reaching a higher spot within this first room leads the players to the second intermediate room. In this room the players can use again the crouching mechanic in order to perform some stealth and avoid having to fight some enemies that are roaming around the place.
Once going through the second room, the path leads the players to a bigger one with an overall view from above. This offers them a vantage point and at the same time adds to the level's verticality. The players can see more enemies and get a general idea of the situation before deciding the best strategy to move forwards. In here, there are some elements that can help the player to traverse while going unnoticed but combat seems inevitable.
After following mostly one single path, the level here starts to branch out, offering the players three potential paths they can take, one of them being initially blocked. This leaves the players with two navigational options:
- Following what seems to be the main path
- Following the secondary one that doesn’t seem blocked
If following the main path, the players reach another big area with an altar in the middle acting as POI and some sort of mechanism to unlock a big door. There's one enemy guarding the altar that they can kill and get loot and a potential clue. Once again, the elements in the room offer stealth opportunities for the players to approach the beast and perform a surprise attack.
If following the secondary path, the players reach a smaller room with some loot. Upon further inspection, they find an exit on the other side of the room that seems to be locked so they can’t progress, forcing them to return to the previous room and choose moving forwards through the main path to the altar.
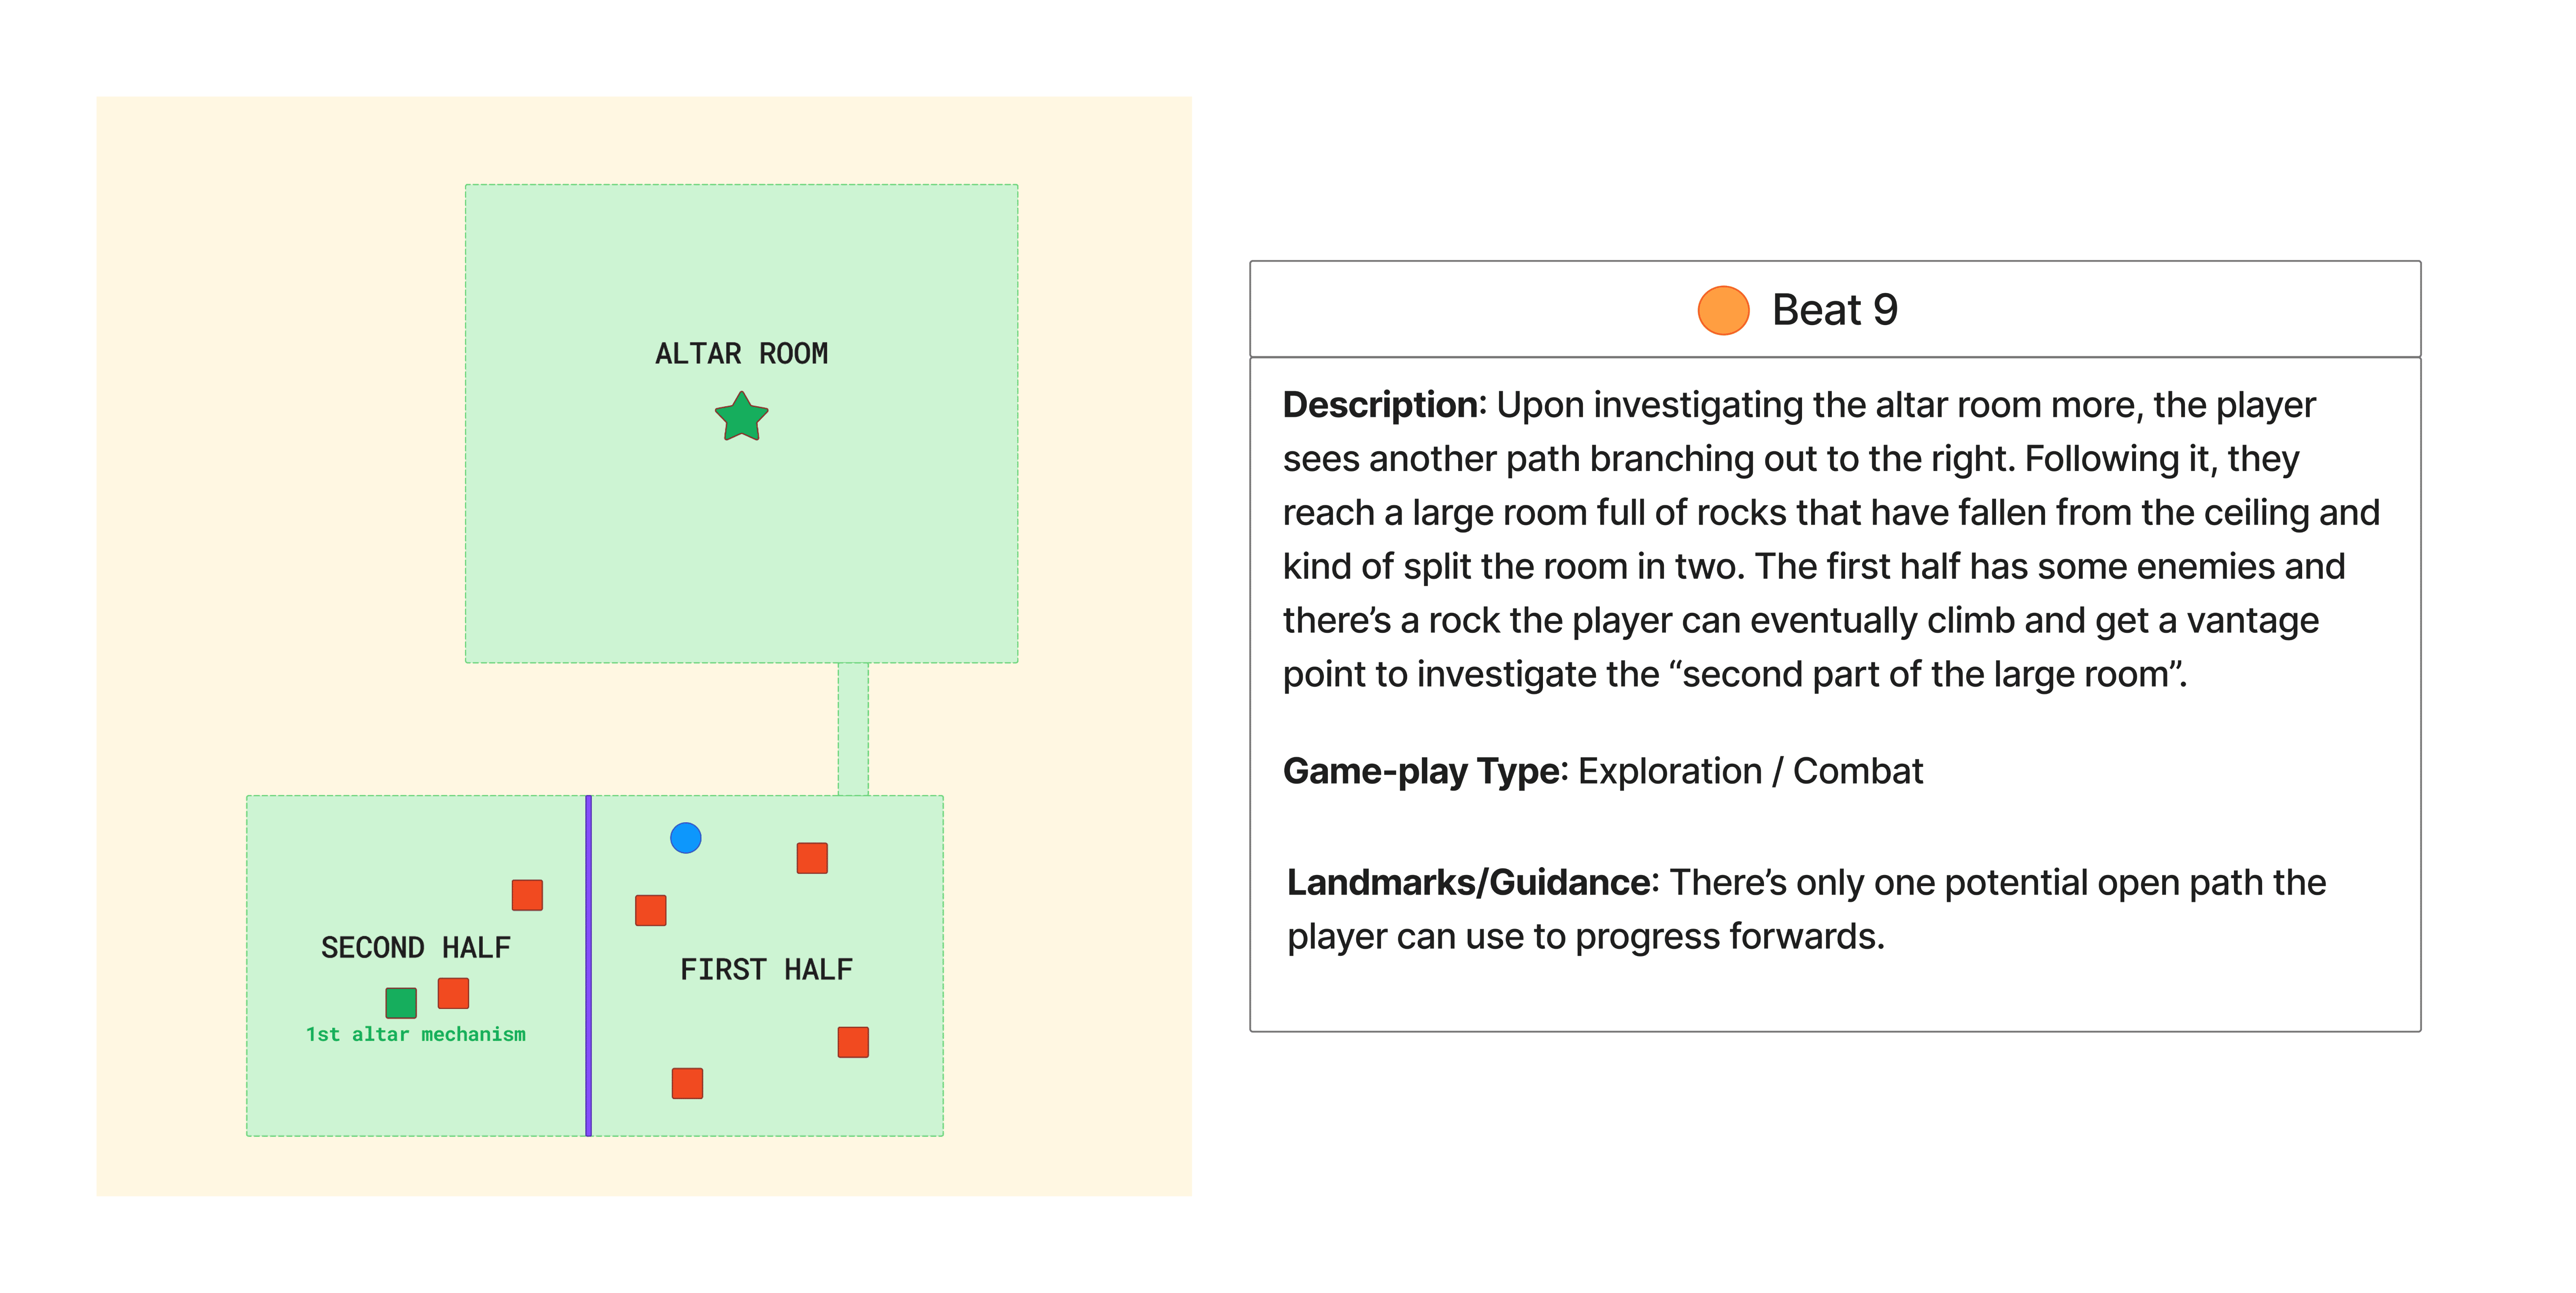
Defeating the monster guarding the altar gives the players some more information about the mechanism and a clue to continue exploring, leading them to another path branching out to the right.
This new large room is full of rocks that have fallen from the ceiling and eventually splitted the room in two parts:
- The first half has some enemies the players can try ambushing individually or ignore and a rock they can climb and get a vantage point instead of entering the second part of the room blindlessly
- The second half has a strange mechanism close to the center with a couple of enemies patrolling around.
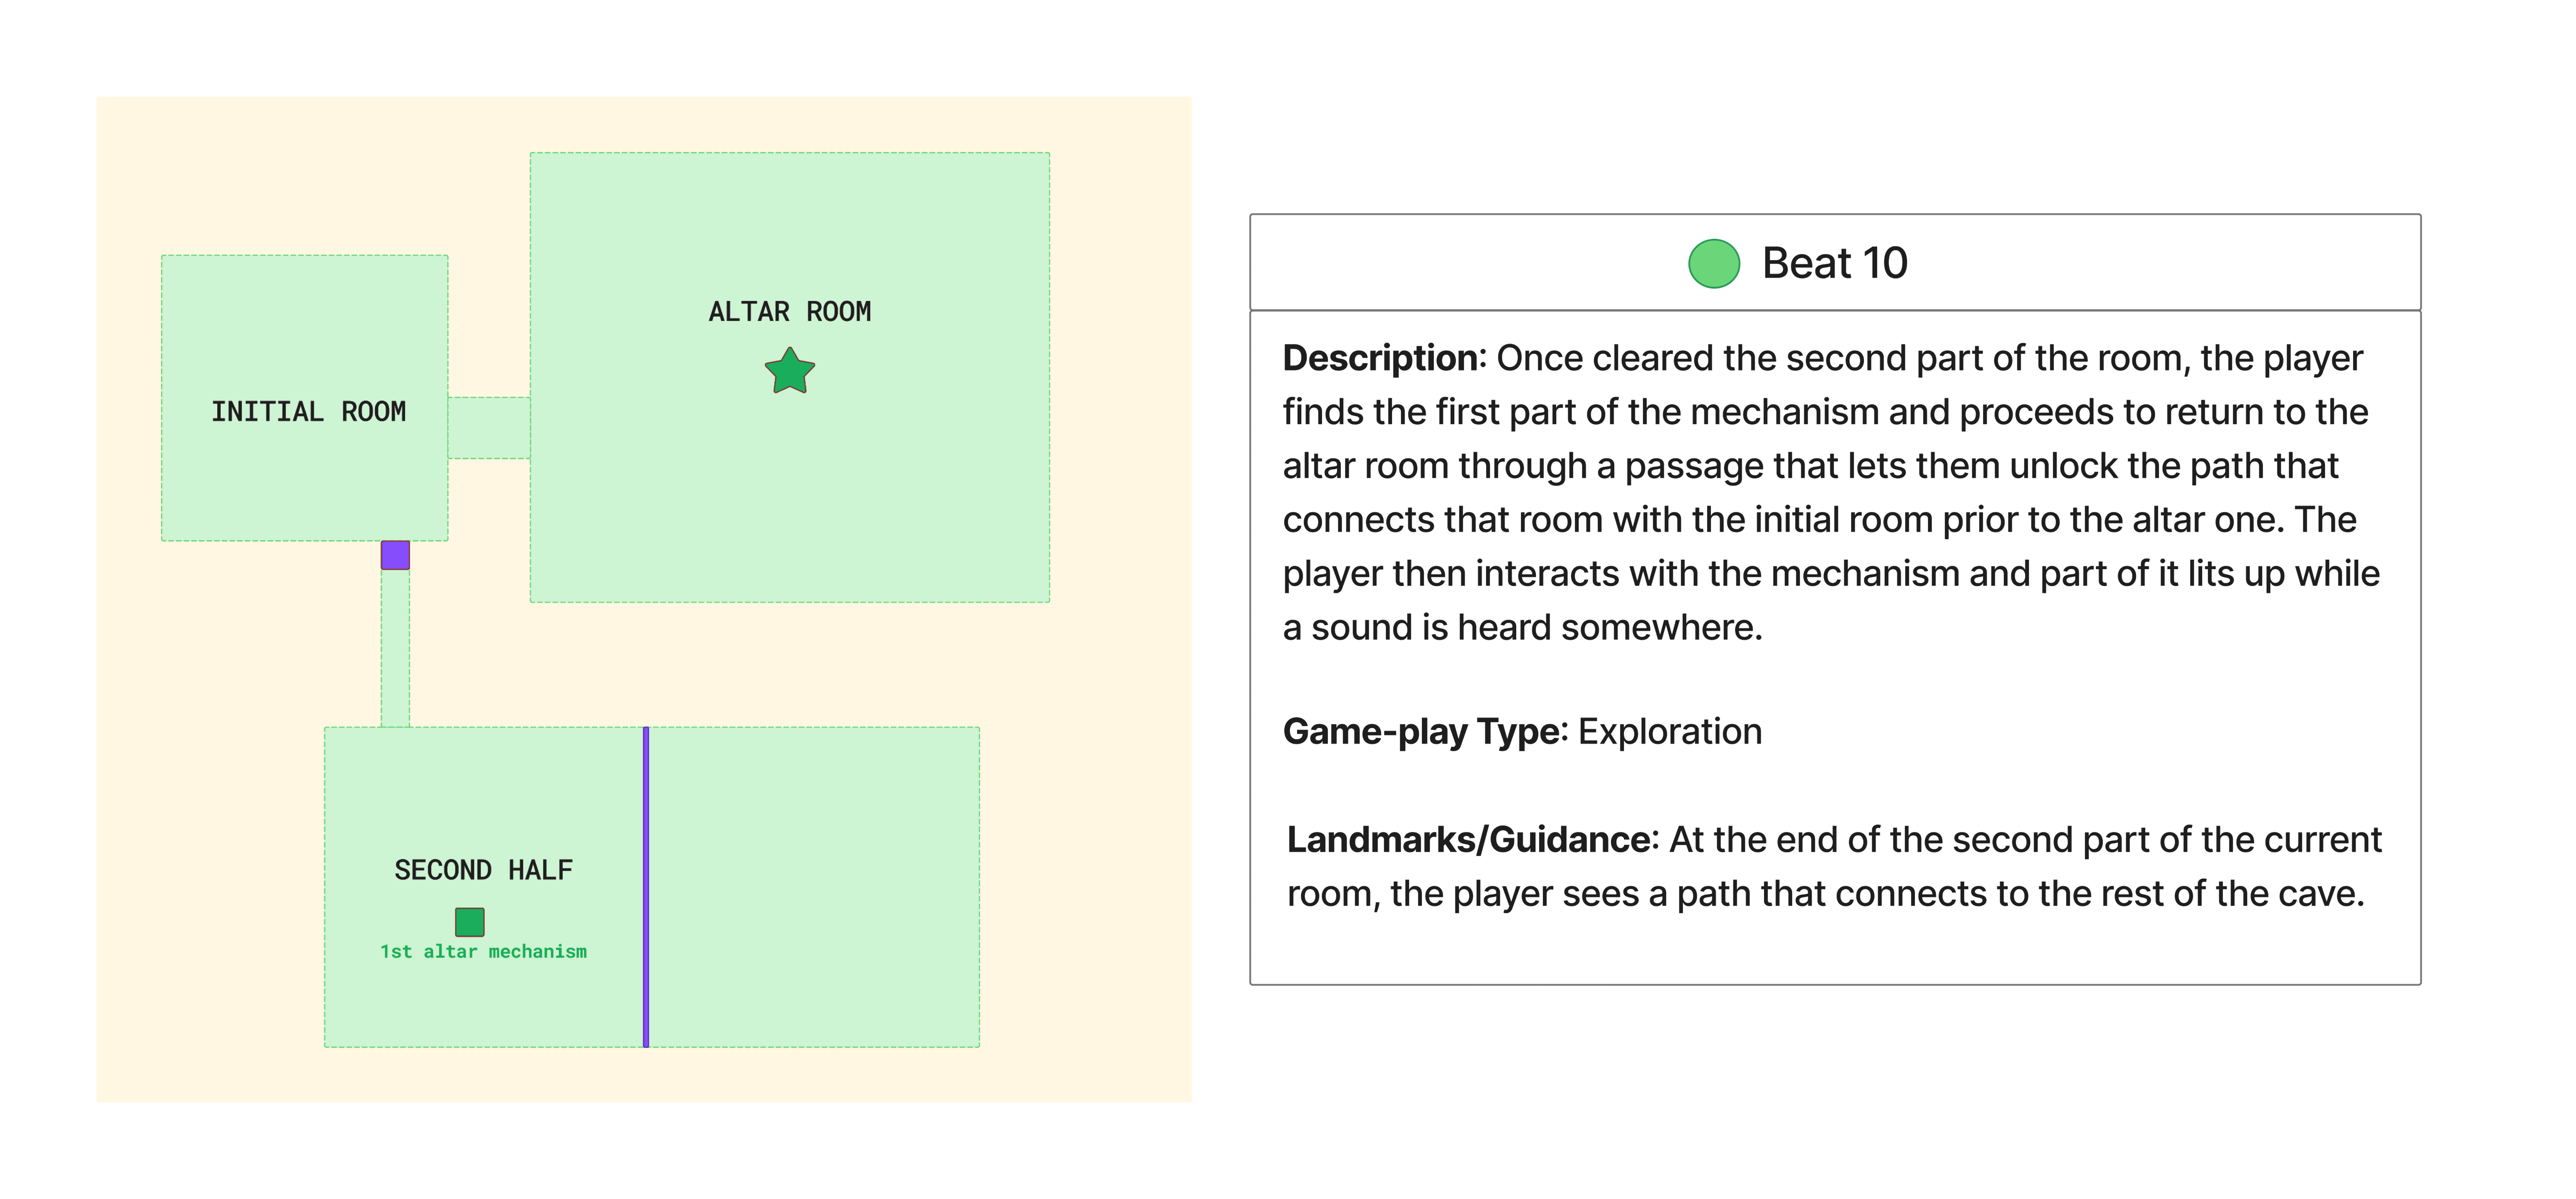
Once cleared the second part of the room, and after picking up the first part of the mechanism, the players can return to the altar room through a passage that lets them unlock the path they saw locked when entering the initial room from above the first time.
At this point the players can interact with the altar by using the mechanism, this one lighting up to inform the players it got activated . At the same time, a sound can be heard somewhere in the cave, offering the players extra feedback they should investigate. This moment helps balancing the level's intensity after some fights, giving the players a pause and the chance to rest and prepare for the rest of the exploration.
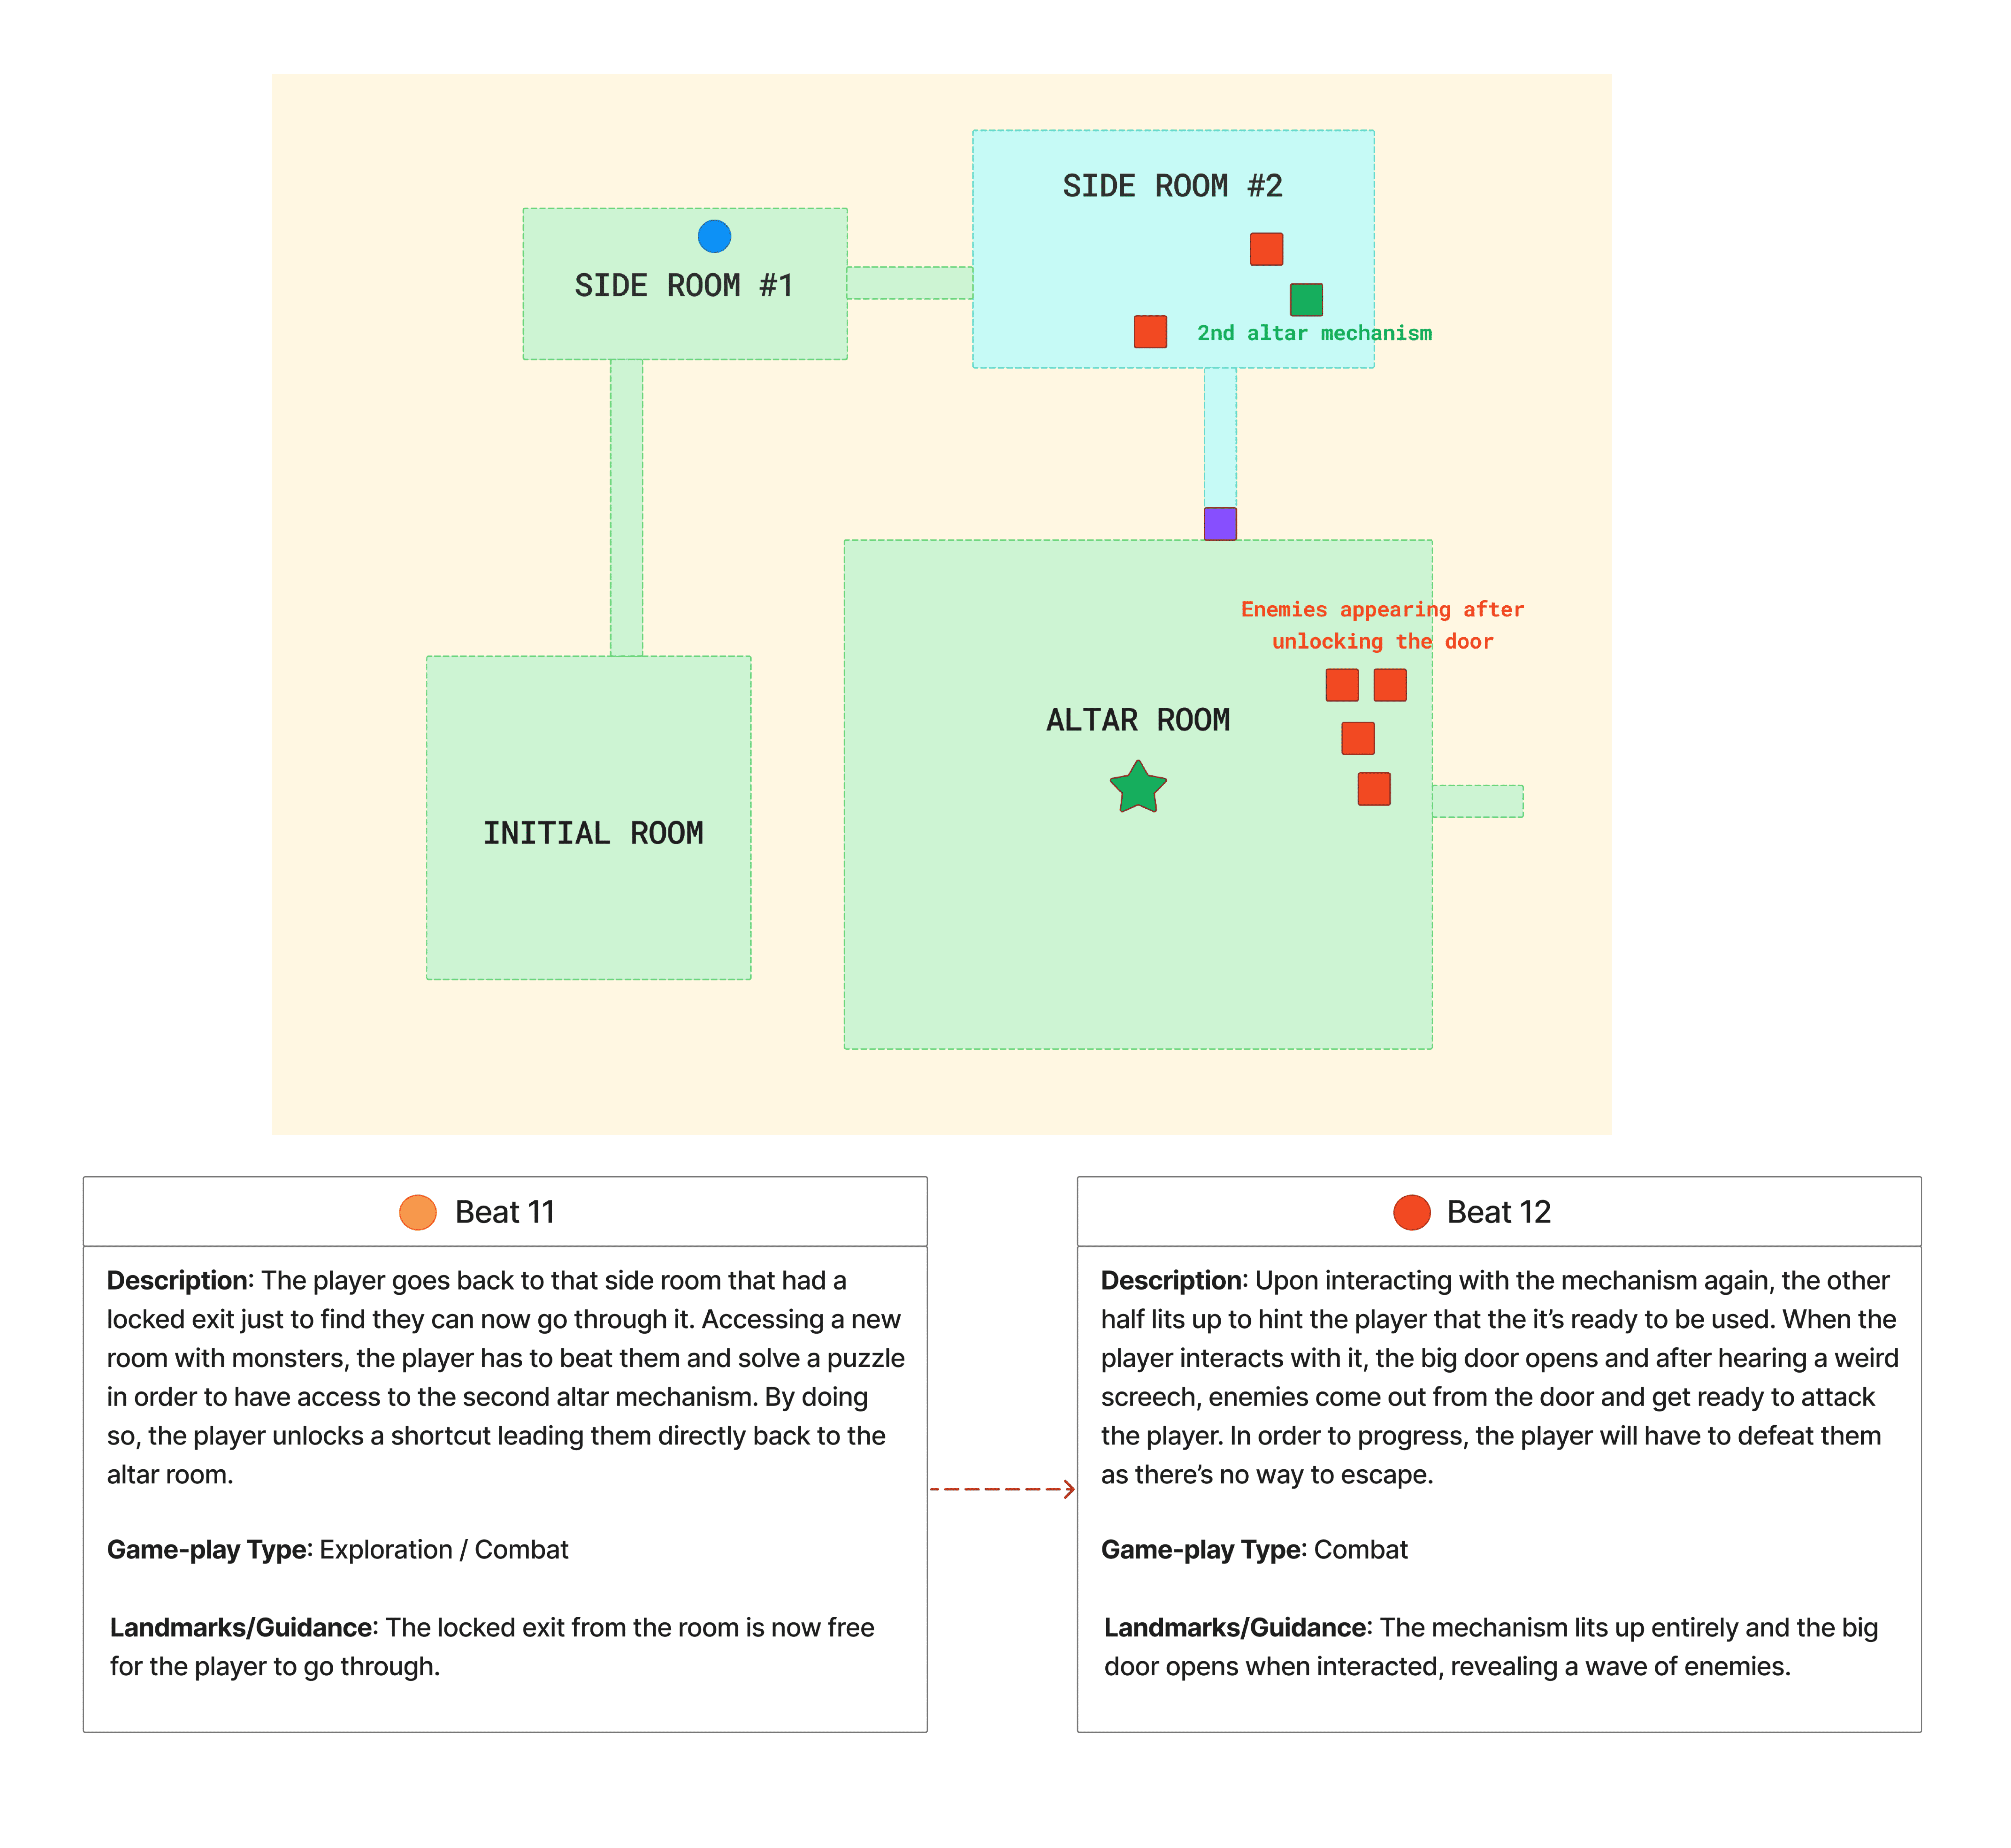
Hearing the strange sound and with the current exploration, the players go back to that side room that had a locked exit. Entering the room again, the players see that exit is now accessible.
The path this time leads the players to some sort of lower level for the first time in the entire cave, light being a bit more scarce and more rocks and debris acting as obstacles. Soon the path opens up to yet another room, its structure resembling a small laberynth formed by more fallen rocks, some of them with cracks that allow the players to see through them. The sound of beasts as they move inform the players of the enemies' presence, making it even more important to use those cracked walls as advantage.
The second altar mechanism this time is locked behind a barrier the players need to deactivate by solving a puzzle. By doing so, the players unlock a shortcut leading them directly back up to the altar room . Upon interacting with the main mechanism again, the other half lits up to hint the players that it’s ready to be used. The big door opens and after hearing a weird screech, enemies come out from it and get ready to attack the players. In order to progress, the player will have to defeat them as there’s no way to escape.
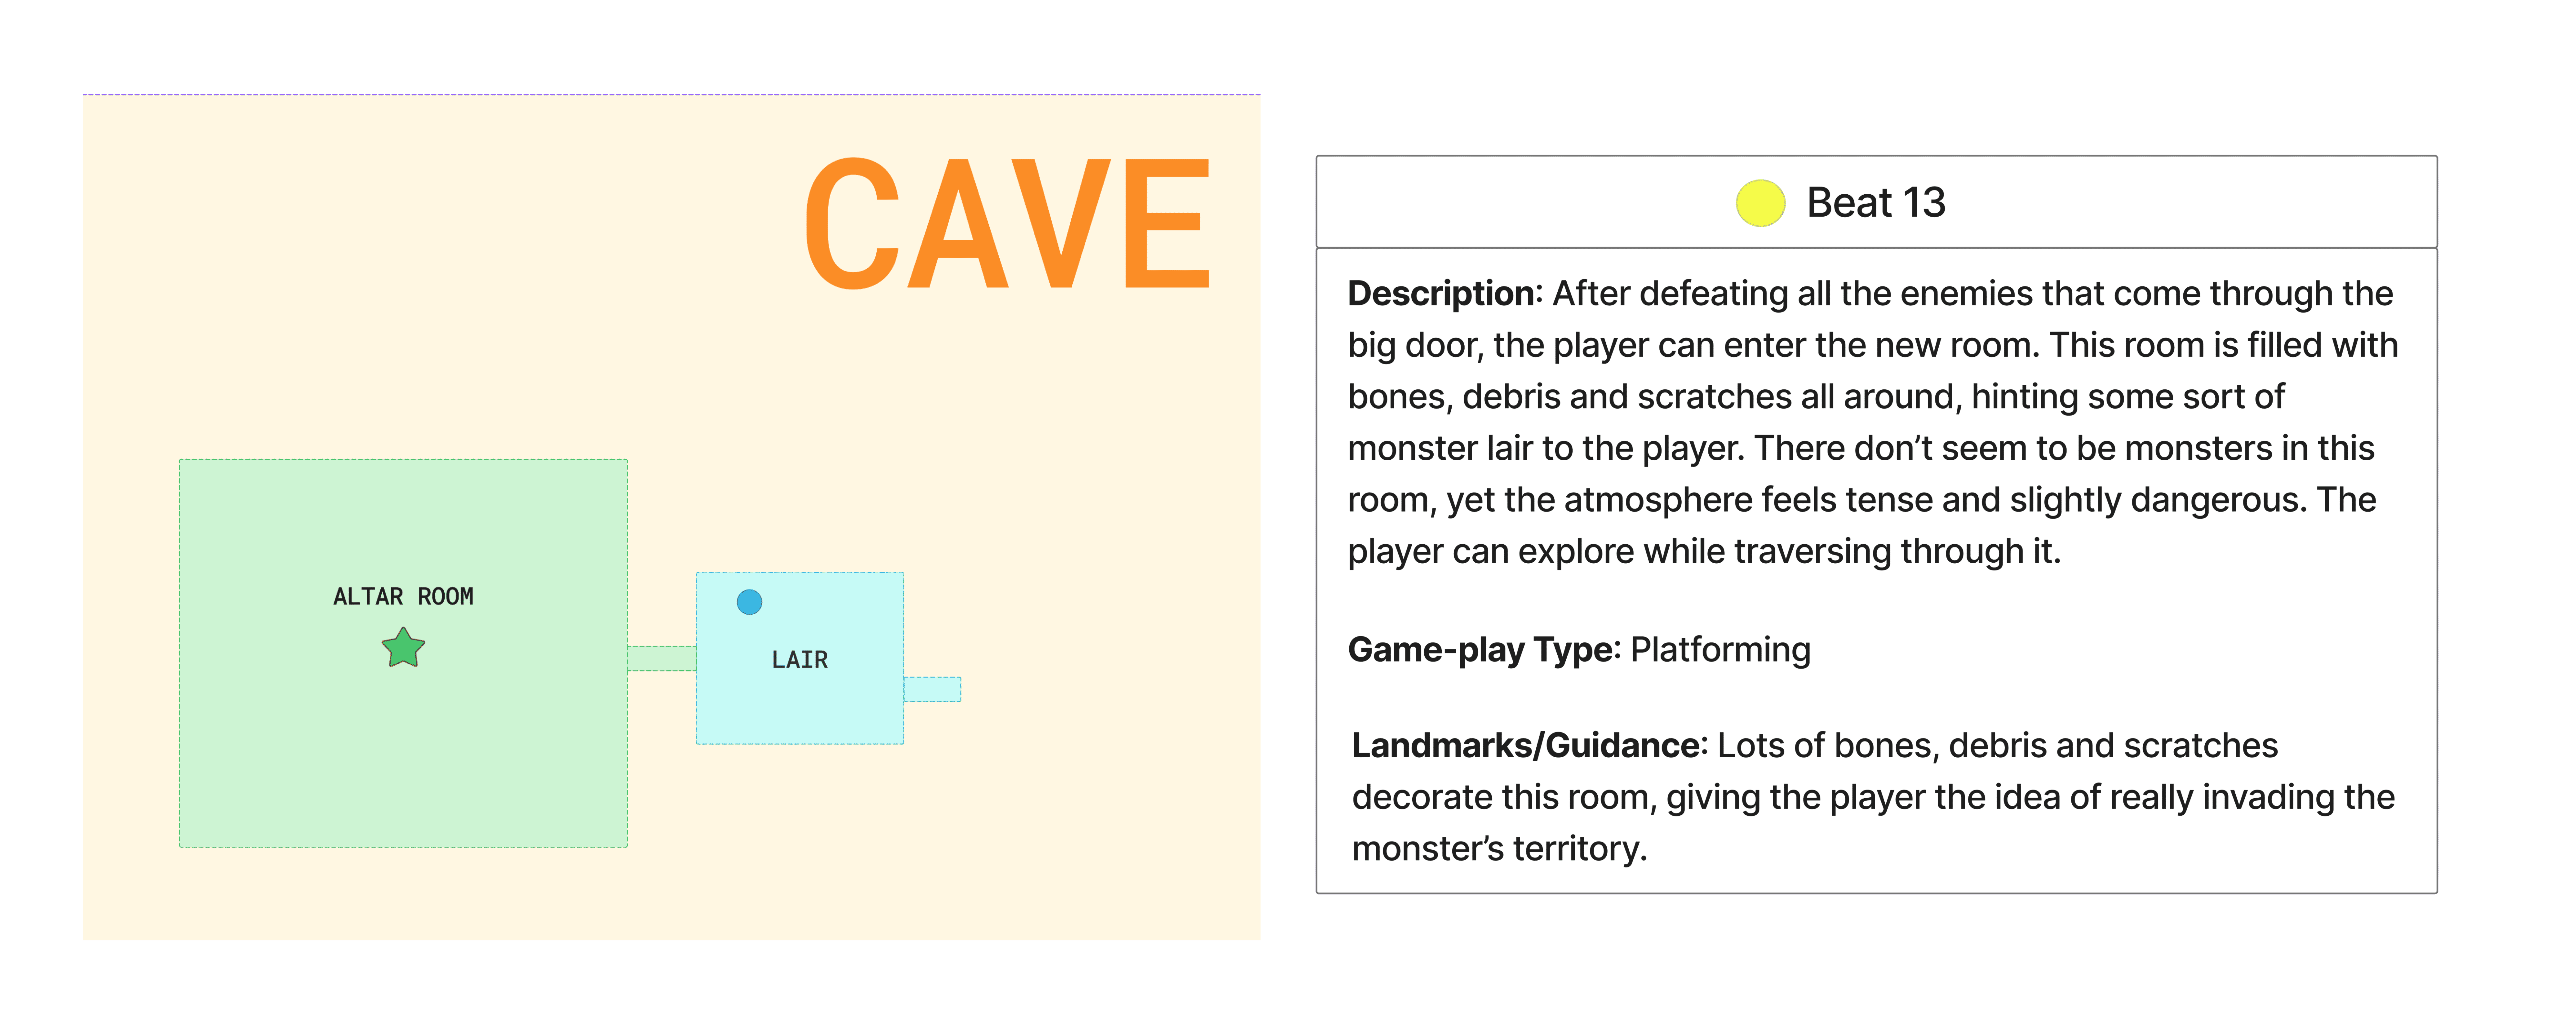
After defeating all the enemies that come through the big door, the players can go through it and resume the exploration. Like after obtaining the first part of the mechanism, the players enter another moment of pause, yet this time the idea is to keep the tension higher.
To achieve such effect, the new room is filled with bones, debris and scratches all around, hinting some sort of monster lair to the players. There don’t seem to be monsters in this room, yet the atmosphere feels tense and slightly threatening. This lair is located in the lower level, boosting the idea of the players getting deeper and deeper into the cave and closer to the more dangerous area .
The player reaches a big area with a big tree in the middle of it. The tree glows in a weird way yet it feels really magical and, somehow, welcoming. As the player approaches it, the glowing intensifies and the players are invited to interact with it.
Upon doing it, the entrance used to enter the room collapses as the floor begins to tremble and a big monster falls from the ceiling, immediately facing the player. The player has no choice but to fight the boss.
The tree reacts to the player defeating the monster and changes its glowing color at the same time as something seems to break at the back of the room behind the tree. Additionally, something falls from the monster for the players to collect as loot.
A new hole appears, giving the players a chance to escape that big room given that the previous entrance is now blocked by rocks. This new corridor ends up in a secret room where the players find a survivor, most likely related to the corpse the players found at the initial plateau.
Upon talking to him, the players need to solve a puzzle with the help of the new item in order to unlock one final room where they will find the hidden treasure the survivor and his partner were trying to discover.
Once the players solve the puzzle, another passage unfolds in front of them, leading both the players and the survivor towards the final room of the level where the hidden treasure awaits. After collecting it, and upon further investigation of the space, they find a semi hidden path they both follow so they can escape the cave, eventually appearing in the gap the first beast used to infiltrate the cave after the cutscene.
Level Design Workflow - Intensity chart

With the Diagram Flow and Beat Chart in place, here's the Intensity Chart that lets me to visually check how the level feels in terms of pacing and intensity. With this information, I can then have a clear picture and see if the level might have moments where the players go through boring or uneventful phases for too long or, on the other side, they experience too many tense moments in a row. This chart and playtesting the blockout will help balance the entire level.
Level Design Workflow - Blockout
Work in progress ... coming soon!